Today's tutorial comes to us from Jane Ruhl, the talented designer of Sweet Pea Fashions! Jane is a retired civil engineer who started crocheting over forty years ago. For Jane, writing patterns is the best of both worlds: crochet, and problem solving! Today, she sells her wares at craft shows, through her Etsy shop, and here on Pixie Faire (click here to see her designs). Thank you Jane for sharing some of your expertise with us today!
--------
We all love the Liberty Jane Sorrento pattern because it is so versatile. The sewing pattern was designed to use premade crocheted trim or braided fabric, and it is available in three different doll sizes.


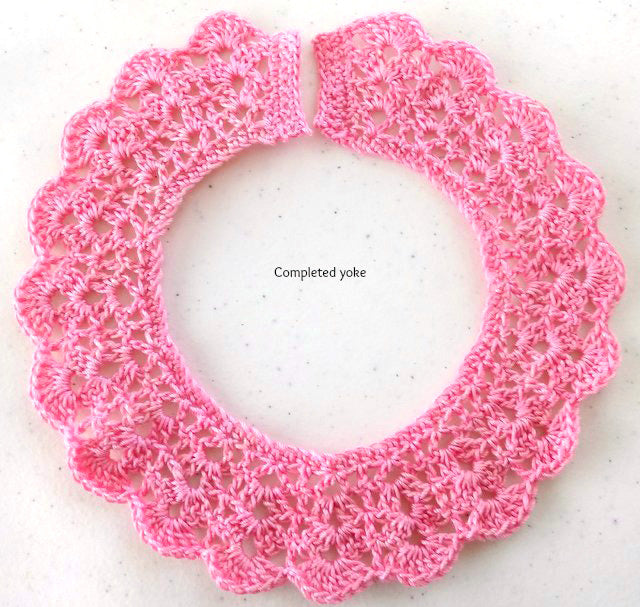
The yoke of the top can be made for just about any kind of trim, so you can make it casual or elaborate, depending on your mood. If you crochet, you have even more options for the yoke. This tutorial will show you how to adapt an adult collar pattern into a crocheted yoke for your Sorrento top.
The pattern used for this tutorial is based off of a design for an adult sized top that was made from worsted weight yarn. To make it doll-size, it will be worked in size 10 crochet thread with a size 8 (1.5 mm) steel hook. While I chose this pattern, you can choose any pattern that starts with a foundation chain at the neckline.
I made an 18 Inch doll sized Sorrento Top. However, a yoke for any doll can be made by adapting these basic instructions.

The collar has a repeating pattern, enabling you to make it in any size that you want. The basic unit is shown in this diagram.

The yoke has five rows. To start the first row, make a chain that is a multiple of four plus two. To determine the length of this chain, consult your Sorrento pattern. Look at Step 9 and find the length of the trim after it is gathered to fit the doll’s neckline. This chain should be one half inch less than that length. For the AG-size yoke, that dimension is 11 inches, so the foundation chain should be 10.5 inches. The foundation chain in this tutorial is ch78 (19 x 4 = 76, 76 + 2 = 78). Note that everyone crochets differently, and your chain may not be 78 chains long. Just make sure that it is a multiple of four plus two more.

Row 1 - Work ahdc in the 3rd chain from the hook, 1 hdc into the remaining chains. Turn. Before proceeding to the next row, check to see that your yoke has the correct length that you determined from Step 9 of the Sorrento pattern. This doesn’t need to be exact, just close.
Row 2: Ch 3, skip next stitch, (1 dc, ch 2, 1 dc) in next stitchto create V stitch, skip next stitch, *I dc in next stitch, skip next stitch, (1dc, ch 2, 1 dc) in next stitch, skip next stitch.* Repeat from * to * until end of row. [If you started with 78 Chain stitches as in the example, you should have 20 doubles and 19 V stitches] Turn.

Row 3: Ch 3, *(2 dc, ch 2, 2 dc) into V stitch [ch 2 space from previous round], skip next stitch, 1 dc in next stitch [should be directly above single dc from previous row]*, Repeat from * to * until end of row. [Make sure your last double of this row is worked into the top of the ch-3 from the previous row.] Turn.
Row 4: Ch 3, *(3 dc, ch 2, 3 dc) into V stitch [ch-2 space from previous round], skip next 2 stitches, 1 dc into next stitch [should be directly above single dc from previous row]*, Repeat from * to * until end of row. [make sure your last double of this row is worked into the top of the ch-3 from the previous row] Turn.
Row 5: Ch 3, *8 dc into V Stitch [ch 2 space from previous round], skip next 3 stitches, 1dc into next stitch [should be directly above single dc from previous row]*, Repeat from * to * until end of row. [make sure your last double of this row is worked into the top of the Ch3 from the previous row]. Do not fasten off.
Yoke ends: Turn the work 90 degrees. *Ch 1 and work a row of sc across the end. Turn. Repeat from * two more times. Fasten off and attach thread to the other end of the yoke at the neckline. Work 3 rows of sc across the end of the yoke in the same manner.
Weave in all of your thread ends using the large-eye needle.


Now proceed to construct your Sorrento top. Finish the armhole edges as in Step 1 and gather the front of the top as in Steps 2, 3, and 4. As in Step 5, find the center of your crocheted yoke, and mark it with a pin. As in Step 6, sew the front of the top to the yoke, matching the center points. This can be done either by hand or on the sewing machine.

Skip Steps 7, 8, and 9. Complete the remaining steps, finishing the back edges, attaching the back pieces, sewing the side seams, adding a hook and loop (or snap) closure, and hemming.


Congratulations!


26 Comments
Leave a comment


Carol-Ann
April 20, 2021
How would I add 2 or 3 more rows to make a longer size yoke? In other words until under the arms.
Thank you
Carol-Ann